")
Okay, so, as I said in the chocolate croissant post, this series of recipes use only 1/4 of the croissant dough each (i.e. 1 piece of dough).
That means you can make:
- a batch of croissants,
- a batch of chocolate croissants,
- a batch of these cinnamon swirly things,
- and make a batch of something else too!
All from that one batch of dough, wooooh!
These Cinnamon-Raisin Danish Swirls are probably my favourite out of all three things I made from the dough; they’re crisp, flaky and little chewy from the generous amount of caramelised cinnamon-sugar, plus everyone knows that cinnamon is the best 😉
You will need:
- 1 piece of croissant dough (1/4 of the whole recipe), the step-by-step tutorial for the dough can be found here
- 1/3 cup sugar mixed with 1 tbsp cinnamon
- 1/4 cup raisins
To shape the Cinnamon-raisin Danish swirls:
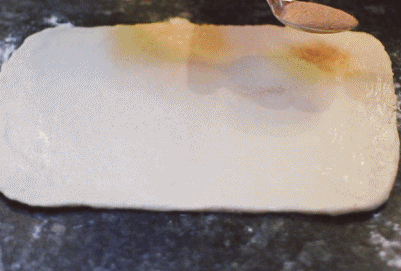
- Remove 1 piece of dough from the fridge, unwrap it and roll out on a lightly floured surface into a 10″ x 8″ rectangle.
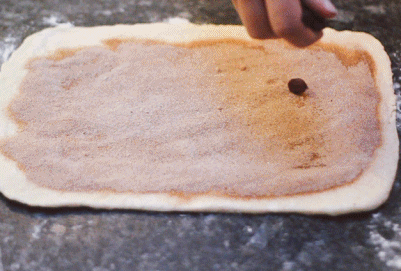
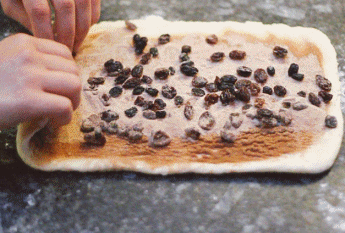
- Sprinkle evenly with a the cinnamon sugar mixture. Then sprinkle on the raisins.

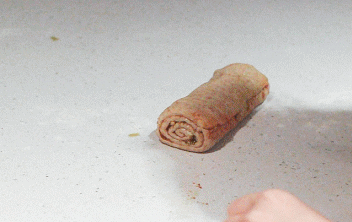
- Starting at the short edge, roll the dough up into a log.

- Cut into 1″ pieces, using a piece of thread / unflavoured floss or a sharp knife (yup, I’m re-using a .gif from before, haha I’m lazy, okay).

- Place, cut side down, 2″ apart, onto a lined cookie sheet.
Bake:
Cover loosely with cling film and leave to rise in a cool place for around 2-3 hours ( if you’re making these the night before, you can actually shape them and leave them to rise in the fridge overnight instead).
Once ready to bake, preheat the oven to 450 degrees F (22o degrees C) . Brush the chocolate croissants with beaten egg using a pastry brush and put into the oven. Immediately lower the temperature to 400 degrees F (200 degrees C), and bake for 10 minutes. Reduce the temperature to 350 degrees F (180 degrees C) and bake for a further 3-6 minutes until well browned and puffy.
Let cool on a wire rack.
These look so flaky and crisp.These would be perfect snack along with some liquid cheesecake spread or ice cream. I love the way you do the GIFS.
haha yes, sounds perf 🙂
I just love your gifs!! Makes it so easy to make the recipe the right way!
thank you!
Of course, your gifs are beautiful as always!
thanks Erica 😉
These look so good and I LOVE your gifs! Such a clever idea.
thank youuu
So neat! I wish I could shape these as perfectly as you did.
It’s all in the cutting! I use a piece of thread to cut through the dough so it doesn’t squish the shape! Works every time 😉
Absolutely beautiful!
thank you 🙂
This is the best blog I’ve seen in ages. Your photography is beautiful and the Gifs are genius! So clever ♥
Thank you so much for this recipe! I made these for my family for Easter Brunch this morning- Danish pastries are my Dad’s favourite… Needless to say I’m in the good books for a while!
Love them, love the blog 🙂 xxx
Can you freeze the Danish once shaped or are these better cooked from fresh?? Thanks
Hi,
Thank you for so informative recipe on croissants.. Never seen something like that on recipes, Gif’s are great way to teach. My question to you is can we use the steamer to raise the dough. Thank you once again.
Love your visual instructions; I think of you as the founder/inventor of gifs!
Hallo
CUT SIDE UP OR DOWN?
I’ve just been researching a whole bunch of recipes for cinnamon rolls and I’ve come across an unexplained fact. In your recipe the cut rolls are to be placed ‘cut side down’ on the baking sheet while other recipes (including Dan Lepard’s) call for the rolls to be placed ‘cut side up’. No explanation is given as to why it should be ‘up’ or ‘down’. What’s your reasoning for placing the cut rolls ‘cut side down’.
Ps. Came here via the Greatbritishchefs website where I enjoyed reading your flourless lemon cake recipe. One of my favourites as well.
Cut side up/down are the same thing when it comes to cinnamon rolls as there are two cut sides! I think the reasoning behind writing ‘cut side…’ is that then the recipe writer conveys that the rolls should be lying flat with the swirls facing upward, not on the side with the swirl facing sideways. Hope that made sense! Thanks for the visit 🙂